One of the biggest benefits to owning one of Google’s Pixel phones is the access to quick, monthly updates. At least, that’s supposed to be the case. In the past couple of months, and randomly throughout the life of the Pixel line, Google has had to push back the release of updates for a week or month or doesn’t make them available immediately, for reasons they rarely explain.
While I know you don’t want to hear what I’m going to say, I’m still going to say it: you can always sideload the updates. That probably sounds techie and a step you shouldn’t have to do to get an update, but trust me, it’s not that hard. It’s basically a command you run from your computer that pushes the update file to your phone, allowing it to install and get you on new software.
By sideloading updates, you’ll have new software up and running on your phone in minutes of Google releasing it. This is the way I’ve updated my Pixel phones for years now because the “Check for updates” button never works, even when Google says it should, and since it’s my job to get new stuff quickly, this is how I do it. Also, I agree that you shouldn’t have to do this to get updates and Google should make them available immediately to all owners, just like Apple does with its devices. Life with Android isn’t always that easy, my friends.
Is it hard to get setup? Not really. Plus, once you do set it all up, you don’t have to do much going forward to get each month’s new update. All you’ll really have to do is download the new update file and remember a command or two. I promise, this is not at all difficult.
Want to give it a try? Let’s run through it.
How to Sideload Google Pixel Updates
This process will work on any Pixel device, including Pixel and XL, Pixel 2 and 2 XL, Pixel 3 and 3 XL, Pixel 3a and 3a XL, and Pixel 4 and 4 XL.
1. Download Android’s Platform Tools
What the hell is Platform Tools? This is a set of tools you download and place in a folder on your computer, so that you can sideload updates on your Pixel phones. You can download the newest version from Google’s developer site. You will find Mac, Windows, and Linux versions.
2. Unzip and place Platform Tools somewhere you’ll be able to easily find it.
This Platform Tools folder is something you’ll need to access each month, so make sure you remember where you downloaded it to on your computer. You’ll be placing update files in this folder and opening a command prompt from within it.
In this Platform Tools folder, you’ll want to make sure you have files in there called “adb” and “fastboot.” Those are really the most important. If you downloaded from the correct place (that link above), you should be good.
3. Download your phone’s update file from Google
To grab the latest update file for your phone from Google, you’ll find it at their “Google APIs for Android” site on a page called “Full OTA Images.” You DO NOT want the “Factory Images” page – you want FULL OTA IMAGES. Got it? Again, you a want OTA files, not factory images.
Once on the OTA page, you’ll find your phone from the lengthy list that goes from Pixel 4 XL back through Nexus devices. Tap on the “Link” next to the monthly update you want and the file will download. The files will likely be bigger than 1GB in size, so prepare yourself.
4. Place update file in that Platform Tools folder
Once the update finishes downloading to your computer, toss it in that Platform Tools folder you should have.
You may want to rename the update file too. It might be named something similar to “sargo-ota-qq1a.191205.011-48752cc4.zip” which you will have to retype exactly in a step here in a minute. Renaming to “sargo.zip” or “january-update.zip” is going to be easier to type.
5. On your phone, enable Developer options and USB debugging
With Platform Tools and the update file ready to go, we need to get our phone prepared for this sideloading action. That means we need to enable Developer options and then within those options, enable USB debugging.
On your Pixel phone, open up Settings>About phone and scroll to the bottom until you see “Build number.” Tap on the build number 10 or so times. With each tap, you’ll see prompts telling you that you are “X” number of taps away from being a developer. On the final tap, if you have any phone security in place, like a pattern or PIN, you’ll have to enter it to move forward. Once done, you’ll see a message confirming that you are now a super-duper, awesome developer.
Go back a screen in Settings and tap on System, tap Advanced, and then “Developer options.” Find the toggle for “USB debugging” and enable it. This setting will give your phone and computer the power to talk together through a command prompt and send over update files.
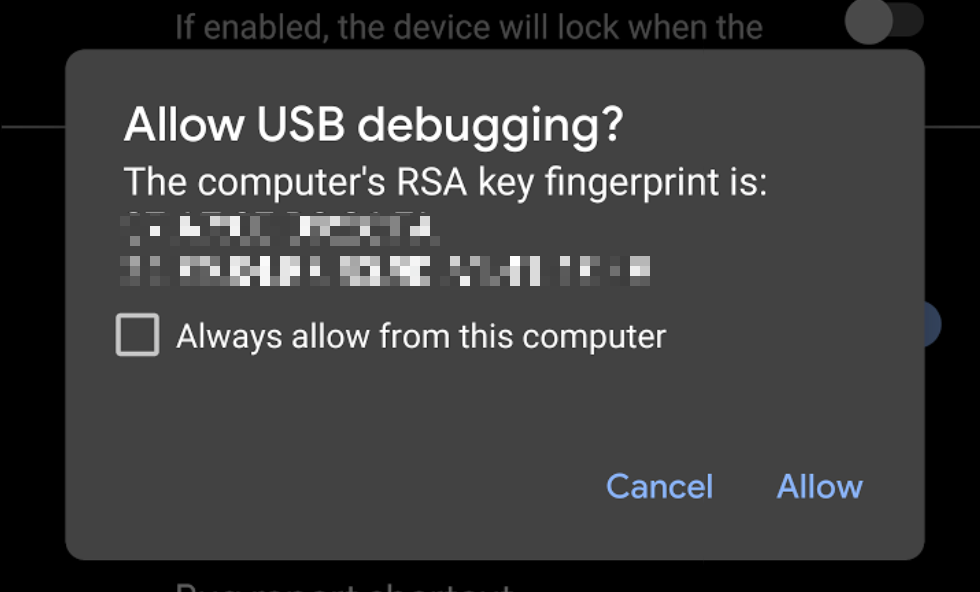
6. Plug in your phone
Now, plug in your phone to your computer and you should see a prompt asking if you want to “Allow USB debugging?” Tap “Allow.” If you plan to use the same computer to do this each month, you can check “Always allow from this computer.”
Didn’t see the prompt below? If you didn’t right away, you will at the next step where we try our first command. Feel free to move forward.
7. Open a command prompt from within Platform Tools
We’re almost ready to send over that update file we downloaded earlier, but first we need to open a command prompt.
- On Mac: Right click on your Platform Tools folder and choose the option “New Terminal at Folder.”
- On Windows: Hold Shift and right click on Platform Tools to choose “Open PowerShell window here.”
Both of those should open a command window within your Platform Tools folder to get you ready to send some commands. Assuming you still have that phone update file in there, it’s time for magic.
Also, this is basically the step you’ll start at each month, once all is setup.
8. Put your phone in Recovery Mode
From your command prompt you’ll type the following command:
- On Mac type: ./adb reboot recovery
- On Windows type: adb reboot recovery
- Then press enter or return
- NOTE: If you get adb error messages on Windows in PowerShell, it’s likely because you need to setup a PATH for Platform Tools. XDA has a good tutorial on how to do that here.
- NOTE (Mac): Yes, on Mac you really need the “./” before “adb”.
9. Grab phone to enter Recovery
Your phone should now reboot and show an Android bugdroid with his chest opened up and a “No command” line. You need to physically press in your Power button (and hold it) followed by Volume Up. So press Power first and hold it, then Volume Up. You should see the screen change to a list of options.
![]()
10. Choose “Apply update from adb”
Using volume keys, move down the list until you are highlighting “Apply update from adb.” Once highlighted, press your Power button to select it.
Your phone will switch to a screen that says “Now send the package you want to apply to the device with “adb sideload <filename>…”
11. Switch back to computer to send the file
Remember what you called the update file in step 4 (ex: january-update.zip)? Type the following command from your computer:
- On Mac: ./adb sideload january-update.zip
- On Windows: adb sideload january-update.zip
- Press enter or return
Your command window should confirm that the file is being sent to your computer, plus your phone will now show that it is “Finding,” “Opening,” and “Verifying” the update file. Just sit back and watch this happen.
Assuming all goes well, it’ll soon run through “Installing update…” and 2 steps. If you grabbed the correct file for your phone, it should complete and finish properly by saying “Install from ADB completed with status 0.”
12. Select “Reboot system now” and you are done
The final step is to highlight “Reboot system now” and tap the power button on it to reboot your phone. You are now updated to the latest software from Google.
Was that difficult? It probably seemed like a number of steps that you shouldn’t have to do regularly. Thankfully, once you’ve walked through that setup process, you really won’t have to do any of it again outside of downloading update files, dropping them in the Platform Tools folder, rebooting your phone to recovery and then sending the file over. Again, I promise that it only takes a few minutes each month and you’ll be updated well before Google gets around to green-lighting the update on your phone.